When I last posted here I was certain it was a new beginning of regular, on-time Cook the Book Fridays posts. Well, now it’s a month and a half later and I’m finally getting back to it. I need to get my act together because CtBF is about to get busy: we are adding a new cookbook to our rotation (more on that next week!).
I have two delicious recipes to tell you about, one of which I actually made about a month ago. But first, we’ll start with the “official” recipe of the week.
Chicken Pot Parmentier

Chicken Pot Parmentier is a cross between American chicken pot pie and French hachis Parmentier (it’s like a French Shepherd’s Pie). It has a chicken pot pie filling and a mashed potato topping.
I felt like I used every pot and pan in the house to make this dinner! It didn’t help that I also poached the chicken in my Instant Pot for both the chicken and the broth used in the recipe. Next time I make this (and there will be a next time) I will poach the chicken a day ahead if I go that route, and perhaps start some of the steps earlier in the day.
My husband is not eating potatoes, so I only made half the mashed potato topping. I put half the chicken filling in a deep-dish pie plate with the potatoes and the other half in a plain baking dish. Everyone’s happy!

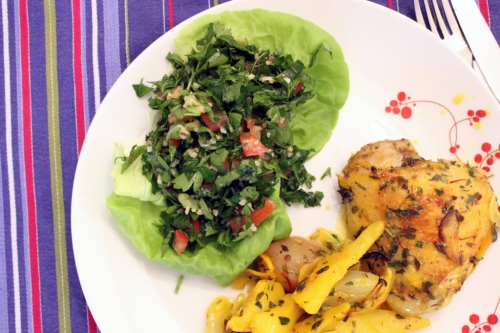
We all LOVED this one! The chicken filling is like the best chicken pot pie you’ve ever had and the potatoes complemented the filling perfectly. My daughter devoured her serving! (seen below in fancy “TV Dinner” form)

All in all, a winner that I will be making again.
Stuffed Vegetables

Stuffed Vegetables are vegetables (duh!) stuffed with a ground beef filling and topped with grated Parmesan cheese.
I made a few changes to the recipe: I replaced the eggplant with bell peppers because we like them better. I had read that a few people thought the meat filling was dry, so I added extra diced garden tomatoes (that I cooked down a bit) for flavor and moisture, and left out the egg. I also skipped the sage and thyme and opted for plenty of basil from the garden instead. The zucchini and tomatoes came from the garden as well.

Yum! We enjoyed these stuffed veggies a lot. The extra tomato really added a nice flavor to the meat filling.
If you would like to try either of these recipes, you can find them in David Lebovitz’s book, My Paris Kitchen.
I will be back next week with an exciting, celebratory post!